Media management
Media management
1. Login
1.1 Employees
To upload content, employees of the University of Hamburg can log in using their UHH-login credentials. The "Internal Login" option is available for users with a local account. Upon your first login, you will need to accept the terms of use and associate yourself with your respective institution. Please note that logging in and using the backend is not possible on mobile devices.
1.2 Students
Students do not need (and do not receive) an account to view videos on Lecture2Go.
2. Video
2.1 Upload and share
a. Log in to the Lecture2Go portal at https://lecture2go.uni-hamburg.de using your user account. Note: If your video is not part of a series, skip points b through d.
b. (Go to section b.-d. in the video tutorial) If your video is part of an ongoing series, as is common with multiple videos per course, create a "series". Open under "My L2Go → Series" and click "Create a new series".
c. On the next page, enter all the required data and click save.
d. If you do not want your series to be publicly available, it is useful to enter a password for the entire series here. If this is done the seperate videos do not need a password anymore, because they take over the password of the series.
e. (Go to the e.-k. section in the video tutorial) Create a new video. Open under "My L2Go → Videos", select the series if necessary, and then click "Add a new video".
f. Enter the title of your video and click "Apply Title", this will be visible to users and searchable if public.
g. Set the date and time of your video. Ideally, choose the day and time when the event had taken place. Click on "Apply date and time". The date will affect the order of the videos within a series and will be displayed to users.
h. Upload your video- by clicking on the "Upload File" button and selecting the recording (MP4 video or MP3 audio file) on your computer. You can also use drag and drop by dragging the video or audio file to the upload area. Additional PDF files can be uploaded, for example to make the slides of a lecture available via download (separate activation required).
i. Enter the required metadata and, if desired, a password. Videos without a password are still not publicly visible and do not appear in search results. If the video belongs to a series, the series password is valid for the video.
j. If you do not set a password, non-public videos will still ask for a password. In this case, leave the password field blank and simply press "Enter".
k. Click "Apply Changes" to save the video.
l. Make sure the upload is complete. Then go back to "My L2Go → Videos" or click "Cancel" on the video edit area.
m. (Go to the section in the video tutorial) If you want your videos to be publicly available, you can publish them via the list of videos by clicking on the lock icon. A possibly entered password will be ignored in this case.
2.2 Subsequently assigning a video to a series or changing it
(Go to the section in the video tutorial) To assign a video to another series, log in and navigate to the menu "My L2Go → Videos". Go to the edit view of the desired video using the edit pencil. You can then select the series in the Metadata section.
2.3 Share
2.3.1 Link
In addition to a direct link to the video, you can also use a series link, which always links to the top video (the newest or oldest video, depending on the series configuration) of the series. The series link to public and to protected videos of a series can be found in the series overview under "My L2Go → Series".
2.3.2 Fiona
In Fiona, a video can be embedded via the automatically generated iFrame code. Instructions on how to do this can be found here: https://www.fiona.uni-hamburg.de/funktionen/templates/box-video.html.
2.3.3 OpenOlat
You can embed videos from Lecture2Go into OpenOLAT as follows:
a. Insert the course element "single page" in the course editor.
b. Go to the tab "Page content" and click on "Create page and open in editor" or on "Open file in editor" in "Selected HTML file". In the editor click on the button "< >" (source code) and insert the video as follows:
c. Open the desired Lecture2Go video on the Lecture2Go website.
d. Select "share" below the video
e. Copy the "iframe code"
f. Paste into OpenOlat in the "source code".
g. Finally, click on "Save and close" in OpenOlat in the still open editor.
2.3.4 CommSy
To embed videos from Lecture2Go in CommSy, follow these steps: CommSy help for embedding media.
2.3.5 General
In general, both public access and restricted access videos can be shared through Lecture2Go's embed feature.
a. For public videos, the embed codes can be found below the video player on the video page.

b. For restricted videos, the embed code for copying is only available to the authorized producer. For this, the "My L2Go → Videos" menu must be accessed after logging in. Select the video to share from the list using the edit pen and open the Share section.

2.4 Permit download
(o to the section in the video tutorial) To enable a video for download, first log in. Navigate to the "My L2Go → Videos" menu and select the desired video from the list. Then click on the corresponding download icon. If you move the cursor over each icon, a tooltip will be displayed in each case. Find the icon with the tooltip heading "Activate download" and click on it. In a dialog box you can now specify which types of media files can be downloaded. The settings made this way affect both currently existing files and files uploaded/created in the future.

Disable download: Proceed in the same way. Select the corresponding "Disable download" icon and click it.

2.5 Enable public access
(Go to section in video tutorial) Videos are initially not publicly viewable and discoverable when created. If necessary, the video can be made public using the lock icon or the publication can be deactivated again. Attention: When activating/deactivating, the link as well as the embed code changes, already shared links or embeds are no longer valid and have to be updated by you.

2.6 Advanced functions
(Go to the section in the video tutorial)
2.6.1 Video thumbnail
In the "Video Preview Image" section, you can change the preview image of the video. To do this, select the point in time of the video in the video player that should act as a preview image and click "Apply changes" at the very bottom. Alternatively, you can upload an image that will be used as the preview image. This is also possible for audio datasets.
2.6.2 Scheduled release
If a video should only be accessible from or until a certain time, you can define a release date or an expiration date. The link/iframe embedcode is invalid until then. Caution: The HTML5 embed code should not be used if you are using a timed release, as no corresponding restrictions can be made there.
2.6.3 Insert video caption into video
A video caption can be automatically created from the metadata of the video, which can be "burned" into the video. Caution: The video caption how it is currently displayed was created in the context of a standard recording scenario for lecture recording with a specific image composition preset on the recording device. In the case of videos produced elsewhere, there is a risk that the video caption will obscure the actual image. It should therefore ideally only be used if a recording has been made with a Lecture2Go recording set.
2.6.4 Raw data
If you have produced additional material in the course of creating a video, you can upload this here and thus archive it and download it again at a later time if required. The content is saved on the UHH object/long-term storage (https://www.rrz.uni-hamburg.de/services/datenhaltung/objektspeicher.html). Files uploaded in this way are not publicly accessible.
3. Series
3.1 Add
(Go to the section in the video tutorial) After logging in, navigate to the menu "My L2Go → Series" and click on "Add a new lecture series".
3.2 Edit
Navigate to the "My L2Go → Series" menu and use the edit pen to select the series you want to edit. Make the desired changes and then click the "Apply Changes" button.
3.3 Delete
In the “My L2Go → Series” menu, you can permanently remove a series using the associated delete icon. The icon is only visible if there are no media records associated with the series. If a series contains one or more media records, these must first be deleted, after which the series can also be removed.
3.4 Assign additional producers
This function is currently only available to Lecture2Go coordinators and administrators. A series can be edited by multiple Lecture2Go user accounts, as well as added videos to it. After logging in, navigate to the menu "My L2Go → Series" and select the series you want to edit using the edit pen. Here you can add a producer to the series and then click "Save".
Producers can contact the appropriate coordinator role if needed (usually your eLearning facility) or contact the Lecture2Go team.
4. Accessibility
4.1 Subtitles
4.1.1 Automated generation of closed captions
Starting from June 2024, all uploaded videos and audio files in German and English will be automatically subtitled, and the closed captions will be provided to users marked as automatically generated. Please make sure to select the correct language in the metadata to ensure that the subtitling works correctly. The automatic subtitling will be carried out on servers at the Regional Computing Center and is based on the use of open-source solutions, such as Subtitle2go. After the transcription is complete, the closed captions can be edited in the subtitle editor and then republished.
4.1.2 Editing subtitles
There is a separate section for managing subtitles of a video. Log in and navigate to the "My L2Go → Videos" menu. Find the video whose subtitles you want to edit and click on the subtitle icon. This will open the subtitle editor.

4.1.3 Uploading a VTT or SRT subtitle file
Existing subtitles can also be uploaded to a video using a VTT or SRT file. The subtitle editor (see 4.1.2) has a functionality for this purpose. Uploading will overwrite the automatically generated subtitles accordingly.
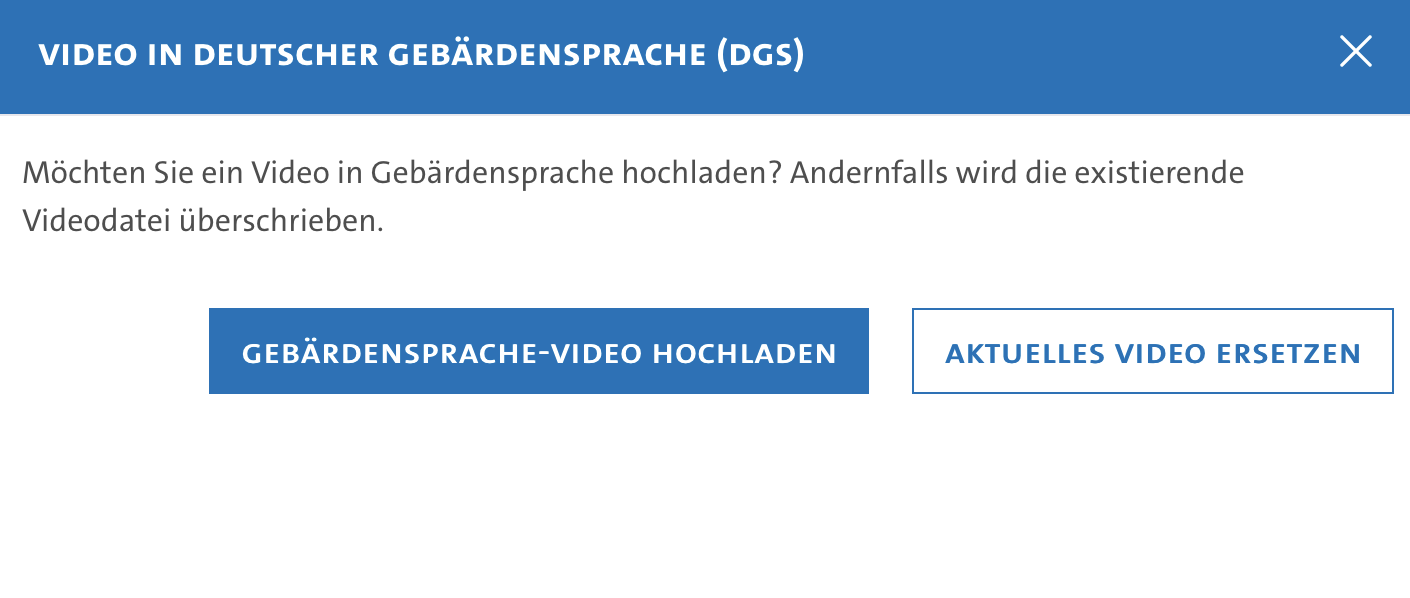
4.2 Sign language
- A video translated into sign language can be added to a video, which users can select in the video player.
- To add a sign language video to a video, first log in. Navigate to the menu "My L2Go → Videos" and select the desired video record using the edit pen. Now you can select and upload the desired MP4 file as usual. Before the upload is executed, you need to confirm that a sign language video will be uploaded. The existing video file must not be dubbed over in this case.

5 Chapters
5.1 Definition
Videos can be divided into chapters and thus divided into several sections (segments). Each chapter has a start and end point and is uniquely named.
5.2 Erstellen und Veröffentlichen
(Go to the section in the video tutorial) The generation of chapters is carried out using the chapter editor and is available to producers. For this, the menu "My L2Go → Videos" must be called up after logging in. Find the video to be segmented and click on the corresponding icon for editing. If a chapter is saved, it will be available to end users from now on.. Wird ein Kapitel gespeichert, steht dieses ab sofort den Endanwendern zur Verfügung.

6 Podcasts
6.1 Overview
To publish a podcast, Lecture2Go offers various options. First, a series must be created in which individual podcast episodes can be uploaded. For each episode, a video dataset must be created, where an audio file (MP3 format) can also be uploaded. Below, we describe the different ways to publish a podcast.
6.2 Publication on Lecture2Go
You can publish your podcast like regular video/audio files on Lecture2Go. Follow the instructions under sections 2 and 3. The podcast will then be listed in the Lecture2Go catalog and can be listened to there.
6.3 Publication on a webpage as embed code
It is best to use the "IFrame code of the series" from the Lecture2Go player. This allows you to embed your podcast with all episodes on any web page and play it directly in the player. No further steps are necessary.
6.4 Publication as an RSS feed
Every publicly accessible series has an RSS feed by default, which can be integrated into podcast/feed reader apps. You can find this RSS feed link by clicking on the RSS feed icon in the "Series" section in the video view.

Important: In order for the episodes to be played in the respective app, they must be made available for download. This setting is explained in section 2.4.
We recommend entering podcast-specific metadata additions and uploading a meaningful cover image. Please follow the initial steps of the step-by-step guide in the next section (Publication on Spotify/Apple Podcasts etc.).
6.5 Publication on Spotify/Apple Podcasts/YouTube etc.
Podcasts that have been uploaded to Lecture2Go can be linked to podcast directories or streaming services like Spotify, Apple Podcasts, or YouTube (formerly Google Podcast). This allows the podcasts to be found and subscribed to on these platforms as well. Proceed as follows:
a. Create or edit a series that should contain the podcast episodes.
b. Check the box for "Configure as Podcast".

c. Enter the relevant information, paying attention to the displayed notes.
d. For publication on other platforms, you must specify the "Owner's email address". You will receive a verification email to show that you are the owner.
e. Upload an image of the podcast in PNG format, ideally with a 1:1 aspect ratio and a resolution of 3000 x 3000 pixels. If you do not upload an image, the preview image of the latest or oldest episode (depending on the sorting order) will be used.
f. Creating episodes: Navigate to My L2Go -> My Videos and create a new video dataset (My L2Go -> Videos -> Add a new video)
g. Upload your audio file in MP3 format and enter the necessary metadata.
h. Publish the "video" by clicking on the lock icon.
i. Enable download (at least for the MP3 file).

j. Now you have a finished podcast and can copy the RSS feed link to submit it to podcast directories (visible in "My Series" in the podcast section or via the RSS feed icon on the public podcast page).
6.5.1 Spotify
You can publish your podcast on Spotify in two steps:
a. First, you need a Spotify account. You can create one at Spotify.com.
b. Then visit the Spotify podcast page (https://creators.spotify.com/pod/login) and follow the steps given there. Once it has been verified that your podcast complies with Spotify's guidelines, it will be listed in the Spotify directory within a few hours and can be accessed via the app.
6.5.2 Apple Podcasts
To publish your podcast on Apple Podcasts, please follow these three steps:
a. First, you need an Apple ID to submit your podcast to the Apple Podcast Directory.
b. Then sign in with your Apple ID on the Podcast Connect website (https://podcastsconnect.apple.com/) and enter the required information.
c. Finally, enter the URL of your RSS feed and click on "Add".
6.5.3 Other platforms
If you want to publish your podcast on other platforms, the process is usually very similar. Please use the documentation of the respective platform.